

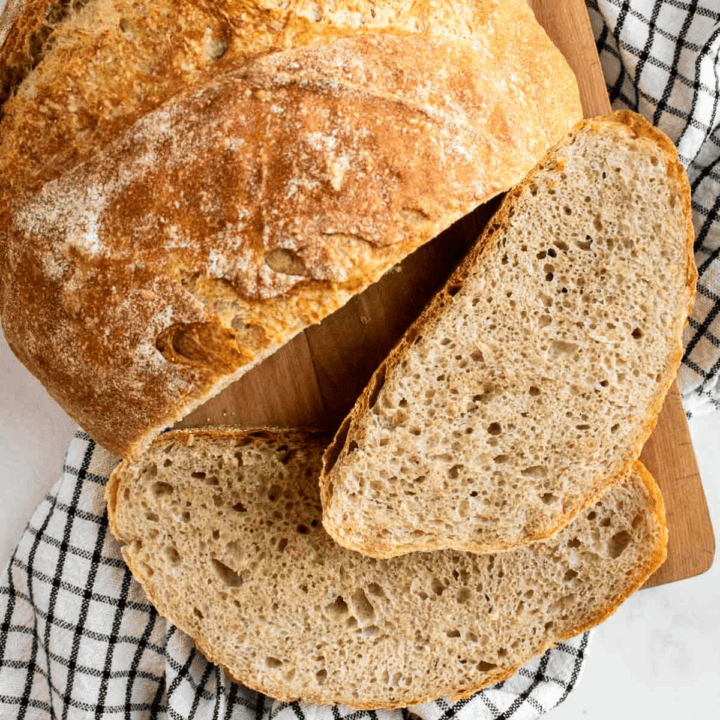
This simple 3 ingredient bread is great for beginners, since it doesn't require any kneading & it slowly rises in the fridge overnight. And we'll bake it in a Dutch oven to create perfectly soft + chewy bread with a crunchy artisan crust.

This website uses affiliate links which may earn commission for purchases made at no additional cost to you.
Foolproof No-Knead Bread for Beginners
You know how some people have that cherished heirloom recipe they are known for? Well I've fully embraced the fact that this simple 3 ingredient bread is now my signature bake. I initially wanted to create this beginner bread recipe for my baking besties who are new to bread, since it's literally foolproof. I've tested and tweaked it over a dozen times! There's no kneading involved, like my Dutch oven no-knead whole wheat bread, which means there's no way you can over-knead it (ew, tough, dense bread) or under-knead it (hello, sad, flat loaf). And at 75% hydration, it has an airy, open crumb, but isn't too sticky that it's difficult to shape. Gotta love that!

Just 3 Ingredients = Perfectly Soft Bread + Crispy Crust
And since there's only 3 ingredients (you heard that right!), I still wanted to find a way to maximize the flavor in this bread. Which is why we're doing a long fermentation in the fridge. There's a lot of nerdy baking science behind this technique including amylase, lactic acid bacteria, etc. Basicallyyy, this technique creates a naturally sweet, slightly tangy flavor & a chewier, more structured texture. Yay, science!
Of course, you can always take it a step further by layering this bread with meat, veggies, and cheese in a delicious artisan sandwich. Or turn it into a sweet breakfast slathered in my whipped honey raspberry butter.
Finally, for that artisan crispy crust, we're baking it in a Dutch oven. However, if you don't have a Dutch oven, don't worry! I have a full recipe to bake a drool-worthy, no-knead artisan loaf on a baking sheet instead.

Let's Gather Our 3 Ingredients
- Flour: I recommend using bread flour, which creates a deeper-colored crust and chewier texture than all purpose flour.
- Yeast: Since the dough is rising overnight in the fridge, there's no need for a quicker rise with instant yeast. However, if that's all you have on hand, you can swap that in for the active dry yeast.
- Salt: It's important to use table salt or fine sea salt. Kosher salt granules are too big, and they won't distribute evenly throughout the dough.
Let's Bake Overnight No-Knead Bread!
For the full step-by-step directions and ingredient quantities, scroll down to the recipe card at the bottom of this post.

1. Whisk the bread flour, active dry yeast, and salt.

2. Mix in the warm water until it forms a dense dough.

3. Cover the bowl & refrigerate overnight.

5. Proof the dough.

7. Bake covered for 25 minutes & uncovered for 10-15 minutes.

4. Shape the dough into a large ball.

6. Score the top.

8. Allow your bread to cool for at least one hour before slicing.
My Tip for Slow, Cold-Fermented Dough
After testing this recipe both ways, I found that sending it straight into the fridge after mixing it provided a better bread-y, slightly tangy flavor and overall texture once it was baked. Since we aren't kneading the dough, a long, slow, cold rise right after mixing helps the gluten develop, makes the texture super chewy and airy. Which is how we'll easily achieve the perfect bakery-style bread at home!
However, if you only have 8 or so hours to let your bread rise in the fridge, then you can certainly let it sit out for an hour or two on the counter to jump-start the rising process. But don't forget about it! I let mine cold-ferment for 24 hours and it ended up collapsed and over-proofed.


No-Knead Overnight Artisan 3 Ingredient Bread
developed & tested by:
Equipment
Ingredients
- 4 cups bread flour
- 2¼ teaspoons active dry yeast (one packet)
- 1½ teaspoons salt (use table salt or fine sea salt)
- 1½ cups water, at room temperature
Instructions
Day One
- In a large mixing bowl, whisk the bread flour, active dry yeast, and salt.
- Add the water and mix with a large spoon (or your hands) until it forms a dense dough and there are no visible pockets of dry flour.
- Cover the mixing bowl with plastic wrap. Store in the fridge overnight for 10-14 hours, until the dough has doubled in size and looks bubbly on top.
Day Two
- Remove the mixing bowl from the fridge & let it sit out at room temperature for about 30 minutes to warm up. On a lightly floured surface, shape the dough into a ball. Use your hands to gently push the top of the dough down the sides and underneath to create tension.
- Sprinkle a little bit of flour into a proofing basket (banneton) or a shallow bowl lined with a kitchen towel. Place the dough ball seam-side-up in it and cover with a kitchen towel to proof for 30 minutes.
- Place a Dutch oven in your oven, and preheat the oven to 450°F. Allow the oven to preheat for at least 20 minutes, to ensure your Dutch oven is hot.
- Carefully remove the hot Dutch oven from the oven. Score the top of the loaf by slicing two to three ½-inch deep cuts at a 45 degree angle into the top of the dough with a thin, sharp knife or a bread lame.
- Pick up your dough by the corners of the parchment paper and carefully place it inside the hot Dutch oven. Cover with the lid and bake for 25 minutes. Remove the lid and bake for another 10 to 15 minutes, until the crust is golden and crispy.
- Carefully lift the bread out of the Dutch oven and allow it to cool on a wire cooling rack for at least 1 hour before slicing.
Notes
- Prevent Sticking & a Burnt Bottom: Be sure to bake your bread on parchment paper dusted with flour or cornmeal. Otherwise your bread can stick to the parchment paper as it bakes. And if you bake it directly on the Dutch oven's base, it could burn.
- Flavorings: If you want more texture & flavor, you can add dried herbs or small seeds (like hulled sunflower seeds or pumpkin seeds) with the dry ingredients before mixing the dough.

Cammy says
I made this at home, it was super fluffy and easy. Will save this and do it again!
Carissa Erzen says
Yay, Cammy, I'm so glad to hear that!
Lindsey says
Omg finally a bread recipe for busy days when I forget I am out of my homemade bread stash in the freezer! Love that this can be made in one bowl, and it develops flavor overnight! Thanks so much for this classic bread recipe!!
Carissa Erzen says
I love how convenient overnight bread is too! Sometimes I end up not making bread for a while because I don't want to be home all day kneading, rising, proofing, and baking it. This one is a great hack for busy days!