

This flavorful no-knead white bread is made with just 3 simple ingredients & slowly risen overnight in the fridge. Baked on a sheet pan with steam from a pan of water, we can easily create crispy artisan crust without a Dutch oven!

This website uses affiliate links which may earn commission for purchases made at no additional cost to you.
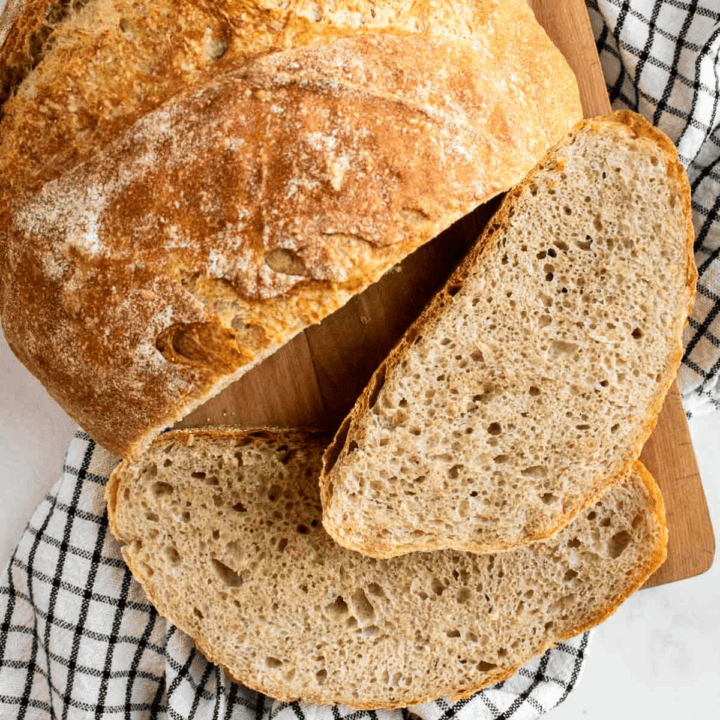
Baking No-Knead Bread on a Sheet Pan
As someone who bakes several loaves of bread in my kitchen every week, I love finding ways to simplify the bread-making process so more of my baking besties can enjoy this rustic tradition. And after sharing my Dutch oven 3 ingredient no-knead bread, I wanted to figure out a way to simplify it even further for anyone who doesn't have a Dutch oven. So after testing this recipe multiple times with several different methods, I'm sooooo excited to share this crusty overnight artisan bread that just requires a good ol' baking sheet.
We're going to rise the dough overnight in the fridge with a slow, cold fermentation that creates the most delicious, deep, bread-y (can that please be a real word?) flavor. Best of all, this method means you don't have to knead the dough! Which I've been obsessed with ever since I made my first hearty no-knead whole wheat bread loaf. And if you want another crusty white loaf on a baking sheet, try my homemade bread bowls next, with the same simple ingredients.

How to Get a Crispy Crust Without a Dutch Oven
- Steam: To allow our dough to rise and get all airy and fluffy before the crust sets, we'll add steam in the oven. All you have to do for this hack is fill a baking dish or baking tray with hot water and place it on the lower rack. The heat from your oven will cause the hot water to evaporate, creating steam around your bread as it bakes.
- Baking Sheet: We're keeping this recipe easy-peasy by baking our homemade no-knead bread on a metal baking sheet sprinkled with a little flour or cornmeal to prevent sticking. Best of all, you don't have to preheat the baking sheet like you would with a Dutch oven.
- Pizza Stone: For an even crispier more traditional crust, preheat a pizza stone in your oven, then bake your loaf on the hot stone.

Ingredients Needed: bread flour, active dry yeast, salt, and water.
Let's Bake No-Knead Bread without a Dutch Oven!
For the full step-by-step directions and ingredient quantities, scroll down to the recipe card at the bottom of this post.

1. Whisk the flour, yeast, and salt.

2. Mix in the warm water.

3. Cover & refrigerate overnight.

5. Score & place on a baking sheet.

4. Shape into a ball & proof.

6. Bake until golden & crispy.

Carissa's Kitchen Tip
As you can see in the photo above, one of my test loaves came out shaped kind of like a peanut - still tasty, just with a little extra "character". If you want a perfectly round loaf, proof it in a round proofing basket or a shallow bowl lined with a kitchen towel.
Tips for Perfectly Risen, Chewy Bread
- Active Yeast: Check the expiration date on your yeast! If it's old, your bread won't rise properly.
- Warm & Cozy: When I bake my bread in cooler months, I prefer to let it proof in a warm draft-free spot, like on top of the oven or fridge, since my kitchen can be quite cold.
- Proof: Your dough is done proofing once it puffs up. If you press your finger lightly into the dough, it should take 2 to 3 seconds for the indentation to disappear. But don't overproof it, since that could result in your bread deflating.


Overnight No-Knead White Bread without a Dutch Oven
developed & tested by:
Equipment
Ingredients
- 4 cups bread flour
- 2¼ teaspoons active dry yeast (one packet)
- 1½ teaspoons salt (use fine sea salt or non-iodized table salt)
- 2 cups warm water (between 105°F and 110°F)
Instructions
Day One
- In a large mixing bowl, whisk the bread flour, active dry yeast, and salt.
- Add the warm water and mix with a large spoon (or your hands) until it forms a dense dough and there are no visible pockets of dry flour.
- Cover the mixing bowl with plastic wrap. Store in the fridge overnight for 12 hours (or up to 24 hours), until the dough has doubled in size and looks bubbly on top.
Day Two
- Remove the mixing bowl from the fridge & let it sit out at room temperature for about 30 minutes to warm up. On a lightly floured surface, shape the dough into a ball. Use your hands to gently push the top of the dough down the sides and underneath to create tension.
- Sprinkle a little bit of flour or cornmeal on a baking sheet. (I don't recommend lining your baking sheet with parchment paper, which can burn at this temperature.) Place the dough ball seam-side-down on the baking sheet. Cover with a kitchen towel and proof the dough for 30 minutes at room temperature.
- Preheat the oven to 450°F. Fill a ceramic, stoneware, metal, or porcelain baking dish or a second metal baking sheet with hot tap water. Place it on the lower rack of your oven to gradually warm up as your oven preheats.
- Once your oven is preheated, score the top of the loaf by slicing three half-inch deep cuts into the top of the dough at a 45° angle with a sharp knife.
- Bake for 30 to 40 minutes, until the crust is golden and crispy. Allow your bread to cool on a wire cooling rack for at least 1 hour before slicing.
Notes
- Avoid Gummy Slices: Allow your bread to cool for at least one to two hours before slicing it. Otherwise your bread can look gummy, since it continues baking a bit even after it comes out of the oven.
- Adding Steam: It's important to add your baking dish to the oven as it preheats to warm up gradually. Rapid temperature changes from room temperature to a hot oven + boiling water can cause some types of baking dishes to crack.
- Clean-Up: To avoid spilling super-hot water, you can allow your baking dish filled with any remaining water to gradually cool down after you turn off your oven before removing it.


Lori says
This would not rise for me. I followed it exactly. I noticed there is no sugar. Would that have made a difference?
Carissa Erzen says
Hi Lori, I'm so sorry to hear your bread didn't rise. Rustic breads like this don't need sugar. Was your yeast within its expiration date? That's the most likely reason your dough didn't rise. Also, how long did you let it rise for in the fridge?