

These buttery German cinnamon rolls called Franzbrötchen are a mix between flaky croissants and sweet cinnamon rolls. If you're intimidated by laminated dough, don't worry, because I've broken down the steps & included lots of helpful tips and process photos!

If a Croissant and a Cinnamon Roll Had a Baby
I love a good pastry cross-over, like my homemade cruffins (aka croissant muffins) and I knew I had to make my own recipe for these croissant cinnamon rolls (cronnamon rolls??) Growing up in Germany, we'd ride our bikes to the neighboring town of Bierstadt and grab a sweet breakfast pastry. And of course, one of my favorites was Franzbrötchen. After several recipe tests and tweaks, I finally nailed down a recipe that my family said tasted just like the ones we'd get from the local German bakery. Seal of approval!

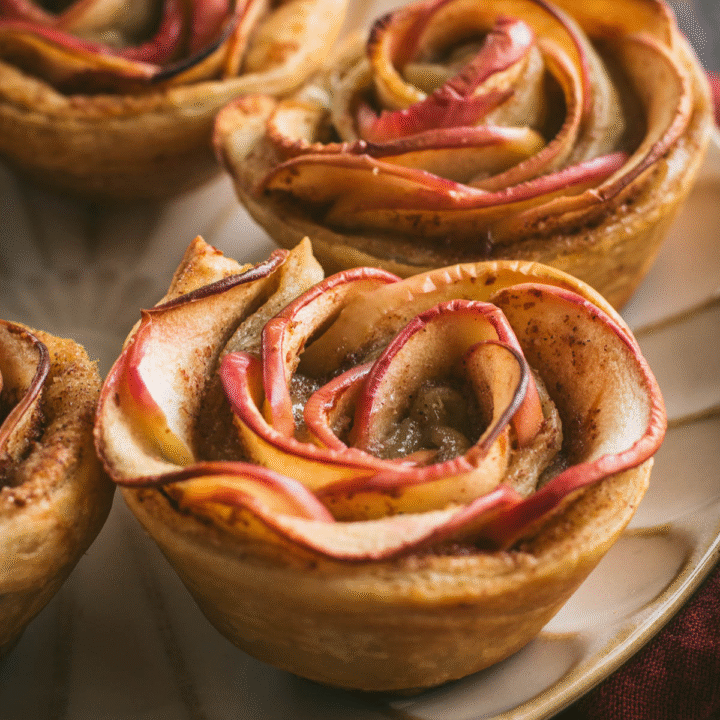
Ok, so let's talk about the drool-worthy flavors and textures already. The brown sugar and cinnamon swirl in each pastry looks like a traditional German cinnamon roll buns, like my Schoko Schnecken. But this dough is actually made from a German laminated yeast dough called Plunderteig, which bakes up with buttery, airy layers, like my citrus morning buns.
After the dough is rolled into swirls, they're turned on their side and squashed in the middle, to create their characteristic flat appearance that shows off all those buttery, flaky layers that shatter with each bite.

Ingredients
- Milk - Adds moisture to the dough and makes it softer.
- All purpose flour - Provides the perfect base structure for the soft and elastic yeast dough.
- Active dry yeast - I recommend using active dry yeast instead of instant yeast, because mixing it with warm milk and sugar lets you know within 5-10 minutes if your yeast is active.
- Granulated sugar - Provides a food source for the yeast, and makes the dough tender and soft.
- Salt - I recommend using non-iodized table salt or fine sea salt instead of kosher salt, for the best distribution in the dough.
- Eggs - Allow your eggs to sit out at room temperature for 30 minutes. This will create a more cohesive dough, since cold eggs straight from the fridge could slow down the yeast's activity.
- Unsalted butter - I recommend splurging on a European butter like Kerrygold, which has a higher fat content than American butter, which will make your pastries taste richer. And European butters are softer and more pliable, so your dough will be easier to roll out. But don't worry, I also tested these with American butter, and they still tasted great.
- Brown sugar - Both light brown and dark brown sugar work for the caramelized filling.
- Ground cinnamon - Provides the essential warm spiced flavor in German cinnamon rolls; you can also add ground cloves, allspice, or nutmeg for more flavor.

Step-by-Step Guide to Making Laminated German Cinnamon Rolls

1. Warm milk in the microwave for 60 seconds.

3. Mix the yeast mixture, salt, eggs, and softened butter with a whisk.

5. Knead on a floured surface for about 5 to 8 minutes.

7. Let the dough rest and rise in a warm place for 1 to 2 hours, until it doubles in size.

9. Cover the butter with more parchment paper. Beat it into a 9x9 inch square block, or ¼ inch thick.

11. Place the cold butter block on top of the dough on a diagonal.

13. Roll it into a rectangle about 9-inches wide by 15-inches long.

15. Wrap the dough in plastic cling wrap and refrigerate for 30 minutes.

17. Mix the brown sugar, cinnamon, and softened butter in a bowl.

19. Gently spread out the filling in an even layer on the dough.

21. Slice the dough in 12 pieces either parallel or diagonal. I prefer to cut parallel, to get even pieces.

23. Firmly flatten the rolls, so the spirals show more from the top.

25. Bake for 20 to 25 minutes, until they're puffed up and golden.

2. Add the yeast and sugar. Set aside for 10 min.

4. Mix in the flour & knead in the bowl until it forms a sticky dough.

6. Shape it into a ball and place it back in the mixing bowl.

8. On a large piece of parchment paper, place the two sticks of cold butter side by side.

10. Once the dough has doubled in size, roll it out until it's about a 14-inch by 14-inch square.

12. Fold the four corners of the dough over the butter.

14. Fold the two shorter edges in thirds towards the middle, like a letter.

16. Repeat steps 13 to 15 twice more, refrigerating after each time.

18. Roll out the dough to ¼ inch thick, about 12 inches by 18 inches.

20. Roll the dough into a spiral log starting at a long edge.

22. Place the rolls on their sides and press down the center with the handle of a wooden spoon.

24. Cover and proof for 30 minutes at room temperature.

26. Transfer to a cooling rack to cool. Then serve and enjoy!
Essential Pro Tips for Your Laminated Dough
- Even Edges: If the butter for your butter block is ending up with rounded edges as you shape it, use a knife to straighten the sides. Then add the cut-off butter pieces to the corners.
- Squished Middle: When shaping your Franzbrötchen, make sure you press down firmly with a thin handle of a wooden spoon. You want it to go almost all the way to the pan.
- Flat Shape: Press the palm of your hand firmly on each pastry, to flatten them; the ones I only gently pressed down puffed back up as they baked. They still taste amazing, but they won't have the same appearance and crispy texture as traditional Franzbrötchen.
Variations on Franzbrötchen
- Store Bought Dough: If you don't feel like making dough from scratch, you can use store-bought puff pastry dough, like my puff pastry chocolate twists.
- Diagonal Slices: Some recipes slice the rolled spiral log of dough at a diagonal, to get the swirls on the sides to show more. However, I during my recipe testing I found that cutting it on a diagonal led to uneven baking.

Storage Info and Tips
Store leftover cooled Franzbrötchen in a paper bag for up to 3 days. A paper bag allows some air circulation, so the pastries can stay crispy. I don't recommend storing them in an airtight container, which could cause them to absorb moisture and become soft and soggy.
Reheating Your Pastries
To reheat, warm them in an oven at 350°F for about 5 minutes. This will help them get their crispy crust back if they've gone a bit soft. You can also warm them in the microwave for about 15 seconds; any longer will cause them to lose their crispy texture.
Making the Dough Ahead of Time
You can make the laminated yeast dough ahead of time, and store it in the freezer for up to 3 months. Thaw it in the fridge overnight, then allow it to warm up for just 20 minutes at room temperature before rolling it out.
Shaping the Pastries Ahead of Time
To freeze unbaked German cinnamon rolls, it's best to freeze them after rolling and shaping them, but before the final rise. Place them on a baking sheet and freeze them until they're solid, after 2 hours. Transfer them to a freezer safe bag, or wrap each one individually in plastic wrap then in aluminum foil. Store in the freezer for up to 3 months.
Thaw the frozen unbaked pastries at room temperature and allow them to prove for about 2 to 3 hours, until they puff up. Then bake them per the recipe instructions.

Where are Franzbrötchen from?
Hamburg was the birthplace of these delicious cinnamon pastries, but now you can find them all over Germany. Franzbrötchen is short for "Französiche Brötchen" which translates to English has "French bread rolls" since the pastry is similar to French croissant pastry. According to foodie folk lore, during the French occupation, French soldiers wanted flaky bread reminiscent of their home.
These flaky German cinnamon rolls were created in part to satisfy the French's craving for buttery pastry, and in part due to some mistakes in the kitchen. Whatever is the true origin story of these pastries, once you try them, you'll fall in love with them too!


Flaky German Cinnamon Rolls | Franzbrötchen
developed & tested by:
Equipment
Ingredients
Dough
- 1¼ cups milk
- 4½ cups all purpose flour
- 2¼ teaspoons active dry yeast (one packet)
- ⅓ cup granulated sugar
- 1 teaspoon salt
- 2 large eggs (at room temperature)
- 6 Tablespoons unsalted butter, softened to room temperature
Butter Block
- 1 cup cold, unsalted butter (2 sticks)
Filling
- ½ cup brown sugar
- 1 Tablespoon ground cinnamon
- 5 Tablespoons unsalted butter, softened to room temperature
Instructions
Make the Dough
- Warm milk in the microwave for 60 seconds, until it's like a warm bath when you put your finger in the milk. To the milk, mix in the active dry yeast and granulated sugar. Set aside for 5 to 10 minutes, until it becomes frothy on top.
- In a large mixing bowl, beat the milk and yeast mixture, salt, eggs, and softened butter with whisk or an electric hand whisk, for about 1 to 2 minutes.
- Add the flour, and mix with a large spoon, then knead the dough in the bowl until it forms a sticky, shaggy dough, after 2 to 3 minutes.
- Lightly dust a clean work surface with flour, and knead the dough by hand for about 5 to 8 minutes, until the dough is smooth and springs back to its original shape when you indent it with your finger. Shape the dough into a ball.
- Place the dough ball back in the mixing bowl, and cover with a kitchen towel. Let it rest and rise in a warm place (like an empty oven with the light turned on) for about 2 hours, until it doubles in size.
Make the Butter Block
- While the dough rises, prepare your butter block. On a large piece of parchment paper, place the two sticks of cold butter side by side. Cover the butter with more parchment paper. Using something firm and heavy like a rolling pin, beat the butter into a square block, about 9-inches by 9-inches, or about ¼ inch thick. Refrigerate the butter block.
Laminate the Dough
- Once the dough has doubled in size, lightly dust a clean work surface with flour. Roll out the risen dough with a rolling pin until it's about a 14-inch by 14-inch square.
- Envelope fold: Place the cold butter block on top of the dough, so the butter block is sitting on a diagonal to the dough's edges. Fold the four corners of the dough over the butter to meet in the center of the butter block. Press the edges of the dough down to seal the seams.
- Lightly dust the top of the dough with flour. Roll the butter-filled dough into a rectangle about 9-inches wide by 15-inches long.Letter fold: Fold the two shorter edges in thirds, like a letter. Wrap the dough in plastic cling wrap and refrigerate for 30 minutes.
- Letter fold: Dust your work surface again lightly with flour. Roll the dough into another rectangle about 9-inches wide by 15-inches long. Fold the two shorter edges in thirds, like a letter. Wrap the dough in plastic cling wrap and refrigerate for 30 minutes.
- Letter fold: Dust your work surface again lightly with flour. Roll the dough into another rectangle about 8-inches wide by 12-inches long. Fold the two shorter edges in thirds, like a letter. Wrap the dough in plastic cling wrap and refrigerate for 30 minutes.
Shape & Fill the Dough
- Line a baking sheet with parchment paper.
- Prepare the filling by mixing the brown sugar, cinnamon, and softened butter in a bowl until it forms a thick paste. Set aside.
- On a lightly floured surface, roll out the dough to ¼ inch thick rectangle, about 12 inches by 18 inches.
- Use the back of a spoon to gently spread out the filling in an even layer on the dough, all the way to the edges.
- Roll the dough into a spiral log starting at a long edge. Slice the dough log into 12 even pieces.
- Place the rolls on their sides on the prepared baking sheet, so the swirl is on the sides. Use the handle of a wooden spoon to press down the center of each roll, so the swirls on each side press up. Then use the palm of your hand to firmly flatten the roll, so the spirals show more from the top. (See recipe photos for visual reference). *If the butter in your dough is starting to melt, place the buns in the fridge for 20 minutes, for the butter to cool and harden, before allowing them to rest and rise.*
Proof & Bake the Pastries
- Cover the baking sheet and rolls with a kitchen towel, and allow it to proof for 30 minutes at room temperature.
- Preheat the oven to 350°F. Bake for 20 to 25 minutes, until they're puffed up and golden brown. Transfer to a cooling rack to cool, and enjoy!
Notes
- Warm Milk: Make sure the milk isn't too hot, or else it could kill the yeast. It should be warm but not steaming.
- Activated Yeast: If your milk and yeast don't become frothy, your yeast isn't active enough to rise the dough & it could be expired.
- Sticky Dough: The dough will be wet and sticky at first. Only add a teaspoon of flour at a time as you knead the dough to prevent it sticking to your hands and your counter.


I'm eggcited to hear from you :)