Turtle Bread (in the Dutch Oven)
developed & tested by:
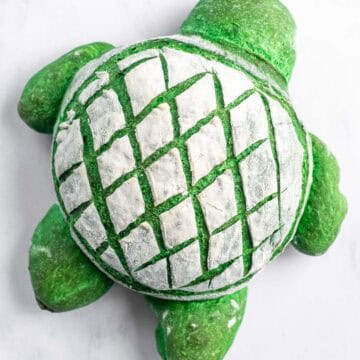
This adorable Dutch oven turtle bread is made with just four simple ingredients, including gel-based food dye for a vibrant green color that doesn’t turn brown as it bakes. And I’ve included step-by-step photos for scoring the shell & shaping the arms, legs, and head.
Equipment
Ingredients
- 1 ⅓ cups warm water (between 100-115F or 38-46°C)
- green gel-based food dye (see note below)
- 4 ½ cups bread flour
- 2 ¼ teaspoons instant yeast (one packet)
- 1 ½ teaspoons salt (use table salt or fine sea salt)
Instructions
- Color: In a large mixing bowl, mix the warm water with green food coloring until it’s dissolved. Add enough coloring to reach a strong dark green, since the color will get diluted once it’s added to the dough.
- Autolyse: Add the flour and yeast to the dyed water and mix until it forms a dense dough. (It’ll look really dry with lots of loose flour in the bowl at first, but don’t worry, just keep mixing for a couple minutes with a large spoon, and it’ll start to come together as the flour hydrates into a dense, shaggy dough.)
- Cover the bowl with plastic wrap or a dinner plate (to trap moisture & warmth) and set aside at room temperature for anywhere from 30 to 60 minutes.
- Sprinkle the salt on top and mix for a minute to combine everything. (It’ll feel dense, so I find it easiest to mix the dough with my hand by squeezing it between my fingers.
- Knead: On a clean surface, knead the dough for about 8-10 minutes by hand (or about 5-7 minutes in a stand mixer with a hook attachment on the lowest speed), until the dough is stretchy and elastic.
- Rise: Place the dough back in your mixing bowl& cover it with plastic wrap or a dinner plate (to retain moisture), and set it in a warm draft-free place to rise and doubles in size, after about 2 hours.
- Shape: On a clean surface, divide the dough into two pieces: one ball that’s ¾ of the dough, and one ball that’s ¼ of the dough. For both balls, create tension on the surface by using your hands to gently push the top of the down the sides and underneath itself. Tuck any seams underneath, then place them seam-side-up in two round proofing baskets or shallow bowls lined with a kitchen towel & dusted with a little flour.
- Proof: Cover both balls of dough with a towel and allow them to proof in a warm spot for 30 to 60 minutes, until they’ve puffed up.
- Preheat your oven to 450°F. Place a Dutch oven with the lid in the oven to become hot as the oven preheats.
- Form the Head, Arms, & Legs: Grab the smaller ball of dough first. Use about one-third of that dough to form a ball for the head & set aside. Divide the other two-thirds of the dough into quarters and form them into thick, long triangles for the arms and legs. Set aside.
- Form the Shell: Sprinkle a little flour or cornmeal on a large piece of parchment paper or a silicone bread sling. Grab the larger ball of dough and place it seam-side-down on top.
- Score: Dust the top of the turtle shell with flour and gently spread it in an even, thin layer with your hand. Use a bread lame or really sharp, thin kitchen knife to make ¼-inch (0.6cm) deep perpendicular diagonal lines, to look like a checkerboard. Cut a large circle around the outer edge of the ball ½-inch (1.25cm) deep (to control expansion as it bakes).
- Gently place the head, arms, and legs slightly underneath the shell on the parchment paper.
- Bake: Remove the hot Dutch oven from your oven and remove the lid. Pick up the bread by holding the corners of the parchment paper, and carefully place it in the hot Dutch oven. Cover with the lid and place it in the oven. Bake covered for 30 minutes, then remove the lid, and bake for an additional 10-15 minutes uncovered, until the crust is crispy. Allow the loaf to cool on a cooling rack for at least 1 hour before slicing. Enjoy!
If the color becomes too light at this point, you can add more food dye & mix again to ensure it’s your desired color.
This dough isn’t sticky, so you don’t need to use any flour while kneading. The dough is fully kneaded once you are able to stretch a small piece of dough between your fingers and see light coming through it before it tears, to pass the “windowpane test”.
I like to set my dough in the oven, turned off, with the oven light on.
You can check if the dough is done proofing by poking the surface of the dough with your finger. If the indentation takes 2-3 seconds to fill about halfway back in, it's ready for the next step.
Notes
- Green Color: I prefer using gel-based food dye since it keeps its vibrant color even after it’s baked. If you want to keep it natural though, whisk 2 tablespoons of matcha powder with the dry ingredients. It’ll be pretty green on the inside, and kind of brown-green on the outside and add an earthy flavor to your bread.
- Shaping: See my step-by-step photos in the blog post for reference of the size & shape of all the pieces.
- Scoring: Dusting the shell with flour makes a big difference in being able to differentiate the checkerboard score pattern on the shell from the green color underneath. I use a bread lame to score my dough, which creates thinner, cleaner cuts than a kitchen knife.
- Storing: Allow the bread to cool completely, then store it in a paper or cloth bag. To freeze, wrap the loaf tightly in plastic wrap then aluminum foil.
Nutrition
Serving: 1 slice (of 12)Calories: 177kcalCarbohydrates: 35gProtein: 7gFat: 1gSaturated Fat: 0.1gPolyunsaturated Fat: 0.3gMonounsaturated Fat: 0.2gSodium: 294mgPotassium: 68mgFiber: 2gSugar: 0.1gVitamin A: 1IUVitamin C: 0.01mgCalcium: 9mgIron: 0.5mg
Did you make this recipe?Leave a comment below - I love hearing from you!