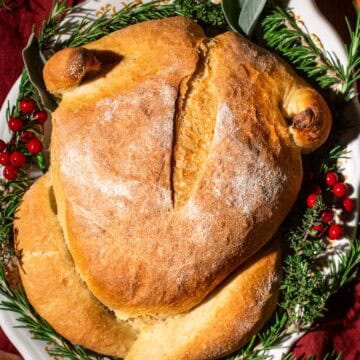
Easy Turkey Shaped Bread
developed & tested by:

This savory Dutch oven Thanksgiving turkey bread is made with dry yeast (no sourdough), garlic, cumin, and thyme for a fun make-ahead holiday side dish.
Equipment
Ingredients
- 4½ cups bread flour
- 2¼ teaspoons instant yeast (one packet)
- 1½ teaspoons salt
- 2 teaspoons garlic powder
- 1 teaspoon ground cumin
- 1 teaspoon ground thyme
- 1½ cups warm water (between 105-115°F or 41-46°C)
Instructions
Mix, Knead, and Rise
- In a mixing bowl, whisk the bread flour, instant yeast, salt, garlic powder, cumin, and thyme.
- Add the warm water to the dry ingredients and mix everything with a large spoon until it forms a shaggy, dry dough.
- On a clean counter, knead the dough for 5-7 minutes by hand (or 4-5 minutes in a stand mixer with a hook attachment), until the dough is smooth and elastic.
- Shape the dough into a ball and place it back in the mixing bowl. Cover with a dinner plate or plastic wrap, and set in a warm draft-free place to rise and double in size, after about 1.5 hours. (I like letting my dough rise in the oven, turned off, with the oven light on.)
Bread flour takes a little longer to hydrate than all-purpose flour, but the longer you knead the dough, the more elastic and smooth it'll become. Towards the end of kneading, avoid adding more flour. If the dough starts to stick to you, wet your hands with cold water.
Proof the Dough
- On a clean surface, shape the dough into a round shape. Create tension on the surface of the dough by using your hands to gently pull the bottom of the bread along the counter towards you. Tuck all the seams underneath.
- Place the dough seam-side-up either in a round proofing basket or in a wide, shallow bowl lined with a kitchen towel dusted with a little flour. Cover the dough with a dinner plate or plastic wrap and allow it to proof at room temperature for about 30 minutes, or in the fridge for 2-4 hours, until an indentation made with your finger springs back to its original shape after 2-3 seconds.
- Preheat your oven to 450°F (235°C). Place a Dutch oven with the lid in the oven to become hot as the oven preheats.
Be careful not to let your dough over-proof, which will make it slack, sticky, and difficult to shape into the turkey.
Shape the Dough into a Turkey
- Once the dough is proofed, sprinkle a little flour or cornmeal on a large piece of parchment paper or a silicone bread sling, and place the dough seam-side-down.
- Wings: Starting just below the top center, make a 45-degree diagonal cut outward, ending just above halfway down the side. Repeat on the other side. (Don’t cut these pieces all the way off.) Bend each flap toward the center and lay it over the middle, leaving about 1 inch between the tips of the wings. If they won’t stick, dab the dough with water.
- Legs: Near the bottom on each side, make a complete cut starting about 2 inches in from the edge (below the wing) and ending just to the right and left of the bottom center. Slide each leg piece down about 1 inch. Pull the bottom edges together and pinch to join. If they won’t stick, tie loosely with baking twine.
- Top: Cut a 1-inch slit at the top center. Gently curve the edges to look like the tops of the turkey breasts.
Bake the Bread
- Remove the hot Dutch oven from your oven and remove the lid. Pick up the bread by holding the parchment paper or bread sling, and carefully place it in the hot Dutch oven.
- Cover with the lid and place it in the oven. Bake covered for 30 minutes, then remove the lid, and bake for an additional 10-15 minutes uncovered, until the crust is crispy and the bread has an internal temperature of at least 205°F. Allow the loaf to cool on a cooling rack for at least 1 hour before slicing.
Notes
- Make-Ahead: Mix and knead the dough then place it in the mixing bowl and cover tightly with plastic wrap. Let it rise in the fridge overnight for 8-12 hours, then proceed with shaping and proofing it.
- Scoring: Cut in single confident strokes. Sawing back and forth drags the dough and collapses the structure so it bakes up flat.
- Shaping: Keep the wings and legs snug against the body. It looks more like a turkey, keeps the thin pieces from burning, and makes slicing much easier.
- Cooling: Let it cool for at least 1 hour before slicing, or the crumb turns gummy.
Nutrition
Serving: 1 slice (of 12)Calories: 179kcalCarbohydrates: 35gProtein: 7gFat: 1gSaturated Fat: 0.1gPolyunsaturated Fat: 0.3gMonounsaturated Fat: 0.2gSodium: 295mgPotassium: 78mgFiber: 2gSugar: 0.2gVitamin A: 6IUVitamin C: 0.1mgCalcium: 12mgIron: 1mg
Did you make this recipe?Leave a comment below - I love hearing from you!